Digital cameras became more available when I was 20 years old, but the quality was very low. Smartphone didn’t exist for another 10 years or so. For someone who tried to document all moments in life, I had to carry 4 or 5 different cameras with me including a digital camera, a film camera, a polaroid, and a selection of speciality cameras.
There was a reason that I tried so hard to keep a trace of fun times. When I was in high school, a devastating flood hit our neighbourhood. Our house is one of the closest to the river bed so the first floor was submerged in the water in a matter of hours. It wasn’t the first time a flood had come to our house, so my brother and I started the preparation soon after we saw the water level rising. One of the main tasks is to move stuff up to the dry floors, and I usually started with stuff on the floor or in the bottom shelves.
As usual, we did everything we can to empty the first floor and the water was about 3/4 up the stairs from the first floor. Because it is mud water, we can’t see what’s under the water even with our military-grade flashlights. We were checking for the last time before we called it a day. This was when I notice a few old photo albums on top of a shelf just around the corner of the stairs. I couldn’t reach it by just standing on the stairs, I had to swim a little forward and around. I decided to go for it, my brother held the light up and I jumped into the mud water with my safety boots, swam over, grab the leather bond albums, froggy style back with hands in the air, and a piece of family history is saved.
The photo albums we saved contains pictures of my parents when they were in their early twenties. We were in shock because none of the pictures fit into the images we had for our parents. We realized they were young as fuck once. Sometimes, my parents would tell us crazy stories but we didn’t believe they were true and now we are looking at the photo evidence of their fashionable past. I thought, one day, my offsprings might recognize me like how I recognized my father – a middle-aged over-weight businessman who doesn’t seem to know what fun is for his entire life. This very thought had inspired me to take as many pictures as possible.
Disney Playmate ディズニー プレイメイト
Pop-up English ソフィア ポップアップ イングリッシュ
いずみ書房 Talking Repeater DX トーキングリピー タ
デジタルカードリーダー
トーキングカードレコーダー
トーキングカードプレーヤー
トーキングカード
リピートカードプレーヤー
Eiki Audio Visual/Video Products Language Master 1832 AR
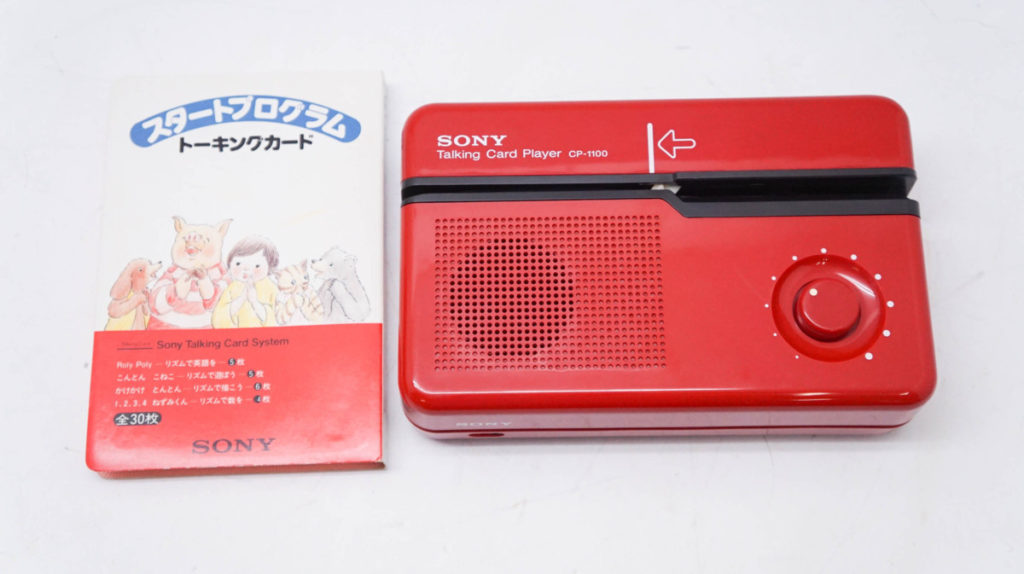
SONY ソニー トーキングカードプレイヤー CP-1100 and CP-33